Showing posts with label boy. Show all posts

Wednesday, April 6, 2011

Sweet and Easy Baby Gifts

Between fulfilling orders and babies being born every time I turn around, it was high time I got to business making some baby gifts. Here's a sample of what I've been up to.


Both booties patterns came from Precious Patterns on Etsy. They seriously have some of the sweetest patterns on the block and at very reasonable prices too! The raggy burp cloth idea came Homemade by Jill. I just drew half a basic burpcloth shape, cut all my fabric on the fold, sewed them wrong sides together (including a cross in the center to keep the pieces from shifting in the wash), cut the fringe and washed them. Super easy. You can seriously whip so many of these out in such little time. And honestly, I do love making practical things for new moms.

I am currently trying to sew my way through my WIP pile...what a job. But it always feels so good to get another thing out of that pile. Not to mention, all those projects are taking up so much room in my craft room right now that I have moved downstairs onto the kitchen table....much to my husband's dismay....muah hah hah! I should make him a deal: He finishes my kitchen backsplash and floor and I'll move back into my own space. Hmn. Wonder if he'll go for it.
post signature

Thursday, March 31, 2011

Boys Need Aprons Too.

In fact, I think they need aprons MORE than little girls. My little guy sure knows how to make a mess. So, using my super easy, 30-minute apron pattern (which I would LOVE to share with you, if only I could figure out how to make a printable PDF pattern with a few pieces that you would tape together...) (and yes...it truly only takes 30 minutes) I whipped up a special airplane apron just for my little man who is utterly obsessed with "papa's airplane."

I shortened my usual pattern for this one, but, it still has that nice, simple button enclosure in the back, which for some reason is always my favorite part.

And while I could have SWORN that I posted my daughter's apron that I made about a year ago, I'm not finding it ANYWHERE on this blog. So. Here is hers, using so sweet little doll fabric that I picked up at a garage sale a couple of years ago.


post signature

Wednesday, February 23, 2011

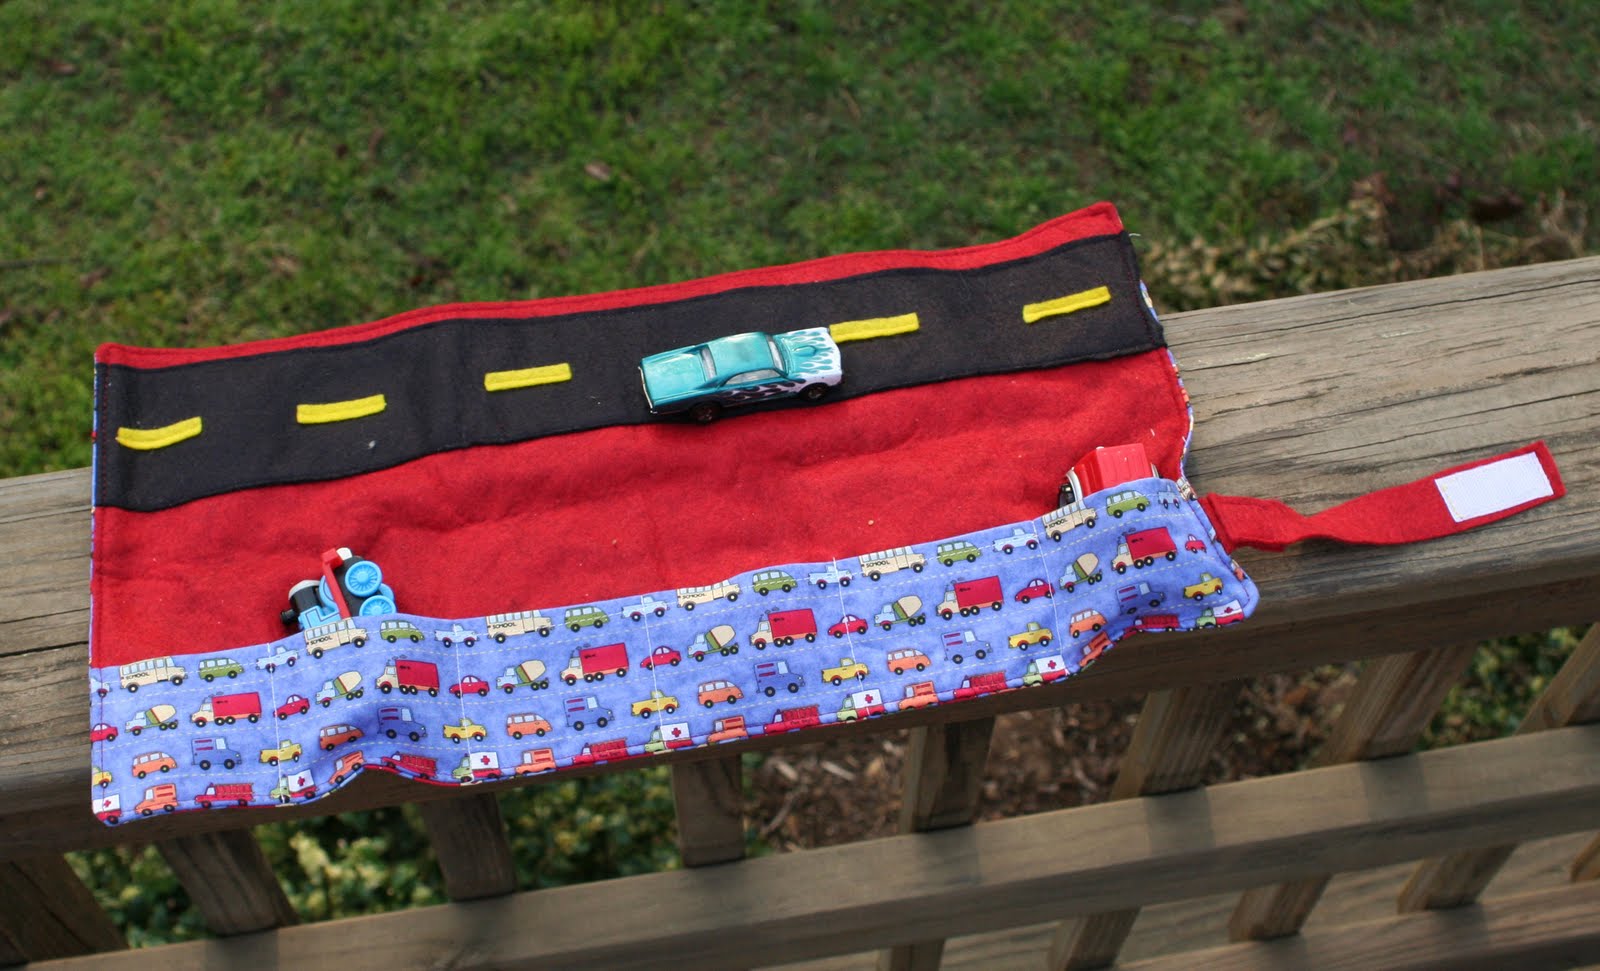
Train Caddy {Tutorial}

I promised a fun tutorial in celebration of Boy Month over at Made by Rae and Made, and here it is! I know there are lots of CAR caddy's out there, but my boy is particularly fond of trains, so I adjusted the pocket measurements a bit and here's what we've got:

It;'s a huge hit for my son and we take it everywhere. So let's get started!! Hooray for boys!! 

Here's what you'll need:

Felt: 10" x 19"
        2- 19" x 1/2" strips
        8- 3" x 1/2" strips
Cotton fabric: 10" x 19"
           19" x 3.5"
           8" x 1.5"
1.5" vecro

**Note: I made two of these at the same time, using two different colors of felt...don't be confused by theblue and the green:) **

1. First, you need to position and sew the train track to the felt. You'll be placing it on the top half of your felt piece. but not too close to the edge, you need room for a seam allowance!

2. Okay, now we need to make the train pockets. You'll need your 3.5" x 19" piece of fabric. Fold one of the long edges down 1/4" and press. Then fold it down again about a 1/2" and press. Then top stitch it. Then you'll align the long, raw edge of the 3.5" x 19" piece with the bottom of your large felt piece and sew it down along the sides and bottom. To make the pockets, find the center of your pocket panel and pin it. now measure out 3.5" pockets from the center and pin each one. (The two outer pockets will be slightly larger than 3.5" which allows for the seam.) Sew down these pockets.

3. Now take the 10" x 19" piece of fabric and place the soft side of the velcro right in the center and about 1/3 of the way up from the bottom. Sew.

4. To make the tab that will keep the caddy together you'll need your 8" x 1.5" piece of fabric. Fold in one of the short ends about a 1/2" and press. Then fold it in half lengthwise and press. Open it and then fold it lengthwise again, but only to the center fold, and press, like in the picture below. Do this to both long sides and then fold once more on your original fold and press. This will give you a strip with no raw edges along the long sides and one of the short ends as well. Now edgestitch around all sides.


5. Now sew the rough side of the velcro to the strip, on the opposite end of the raw edge. It should look something like this:

6. Pin the velcro enclosure tab onto the felt panel, velcro side down, about a 1/3 of the way up from the bottom (so that it will align will the soft side of the velcro, which is on the fabric panel) being sure to leave 7" of the tab. the rest will hang over. See the picture below to get exactly what I'm talking about :)

7. Now, place and pin the fabric panel and felt panel right sides together.

8. Sew all the way around, making sure you catch the enclosure tab and leave a 4" hole in the middle of one of the sides (either the top or the side opposite of the enclosure tab). Trim any excess fabric and clip the corners.


9. Turn the fabric right side out, press and edgestitch all the way around
 
You're Done!! Now fill that sweet little thing with trains and make a little man very happy!


If you're wanting to Celebrate the Boy, be sure to head over to Made  and Made by Rae!

Sharing the love at some of the following:
Monday:
Making the World Cuter Mondays
Keeping it Simple-- Motivate Me Mondays
Skip to my Lou-- Made by You Mondays
Sew Can Do-- Craftastic Monday 
C.R.A.F.T-- Making Monday Marvelous
Tuesday:
Sugar Bee-- Take a Look Tuesday
Today's Creative Blog-- Get Your Craft On!
Creative Itch-- Sew Cute Tuesday
Tip Junkie-- Tip Me Tuesday
Wednesday:
Sew Much Ado-- We Did It Wednesday!
Blue Cricket Designs-- Show and Tell
Someday Crafts -- Whatever Goes Wednesday
Show off Your Stuff -- Fireflies and Jellybeans
Friday: 
Simply Designing
Kojo Friday Fun Finds 
Fingerprints on the Fridge-- Feature Yourself Friday 
Tatertots and Jello-- Weekend Wrap-up
Weekend:
The Girl Creative-- Just Something I Whipped Up
Under the Table and Dreaming-- Sunday Showcase 
post signature

Tuesday, January 18, 2011

Travel Buddies


We do a lot of traveling. And almost all of it is in the car these days. So my kids needed something just their size.


Something with a little pocket for keeping their very special bits and things. And a handle for easy retrieving, or for clipping onto their backpack on an airplane trip.


I got the idea for this on MayaMade, although I didn't actually follow her instructions or measurements.

Here are my measurements and method:

(you'll need about a 1/2 yard to complete one pillow)
2 coordinating pieces: 9 1/2" x 14 1/2" for body
2 pieces: 7 1/2" x 6" for pocket
1- 4 1/2" x 12" piece for handle
Polyfil

Use 1/4" seams.

First I made the pocket by sewing the pieces right sides together, leaving a 4" hole on a long side to flip. Clip corners, turn, press, and sew along the side with the hole. This will be the top open side of your  pocket. Now place it on a pillow piece, pin and sew.

Then, fold your handle piece lengthwise, right sides together. Turn the tube right side out, press and edgestitch down both long sides.

Now, for the pillow. Take one piece and pin the handle, right sides together with raw edges matching. Then pin the other pillow piece right sides together. **Be sure your pocket is face the right direction! Sew the two sides together, leaving a 4" hole in the middle of one of the short ends. Clip the corners, turn and stuff with Polyfil. Then slipstitch the hole closed. You're done!

This was definitely one of their favorite mama-made Christmas presents, next to the playhouse, of course.

And my son was rather irritated that I dare to remove his pillow from his bed...

Friday, December 31, 2010

A Little BOY Dress-up

Currently, Kai's favorite thing to dress up with is Emmie's Snow White dress. While I find it endearing, I do think it would be nice for him to have some more BOY-ish options.

Enter: the cape.
 A friend asked to me to make a cape for her son and I found an excellent tutorial on making two capes out of one yard of fabric. Since I lined these capes, I actually took two yards, but still such a fabulous way to expedite the gift-making.

The only thing I really followed from the tutorial was the cutting of the cape. As for the neck strap, I basically made 1.5" bias tape, sewed it on, and attached the velcro.

(Why the "M"?? Because his name is Malakai...we just call him Kai for short;) 

Wednesday, December 8, 2010

Whew!!!

Is anybody else feeling some of this rush?? I think I need some much needed chill time wrapping some presents...oh wait...I guess I need to FINISH the presents if I want to wrap them, no? Dilemma.

On the other hand, my little girl had 2 birthday parties for 3 girls 2 weeks ago. Um, has anybody checked out the stores lately?? That would cost us at least $30, before tax, for a very simple gift. So I opted for lovely handmade out of the stash with purchased crayons and coloring books, costing us a mere $7. Score.


For easy and simplicity in the making process, these bags ware not lined and the handle is a simply grosgrain ribbon. The bag is made to perfectly fit a handful of coloring books and ten beautiful crayons. 

Thursday, October 21, 2010

Air-peene!!

The little man in my house is two. And utterly obsessed with anything wheels or wings. He also is obsessed with anything his sister has. Like her very beloved backpack, that she'd really rather not share with him...

 So I thought it was an appropriate occasion to get the boy his own backpack.

Of course, I used Rae's marvelous Toddler Backpack pattern. It is such a simple pattern to follow and with such fabulous, sturdy results. Here are some of the specs on how I construct the backpack. I used a quilt weight cotton, medium interfacing and line it with muslin. I love the weight of the backpack this way. Also, I added that fun little pocket in the front, because I am pretty sure all little ones need a special little place to store their most precious of rocks and leaves. If you're wanting to make one, I would definitely check out the Toddler Backpack flickr group for inspiration. Holy Moly. I always get blown away at the cuteness. You've been warned.

So he's off for an adventure, cars and trucks and airplanes loaded into the backpack for safe-keeping.

Thursday, May 13, 2010

Booties!!

Oh man, am I a sucker for booties or what? And there are so many fun patterns out there. With so many babies being born I am always sewing up a pair, and they are so sweet and oh so satisfying. Here are a few recent creations:

I giggle every time I look at these little cuties, which were made from the same curtain panel that I used for the lining of this box and lined with some scrap flannel.
These were made with a thrifted sheet and lined with some cozy fleece.

Both pair came from the genius design of Precious Patterns. They are so simple to put together and require no hand-stitching (I love that!)

Wednesday, April 7, 2010

This kid...

...loves anything with wheels or wings, so when I saw this cozy car caddy on Homemade by Jill, I knew I would be making one for my little man. And it fit just perfectly into his Easter basket. But it's new home will now be in our church bag. I have a feeling it may prevent a few of the otherwise inevitable loud outbursts during our church meetings...

Here it is all bundled up:

Wednesday, March 3, 2010

You Little Drooly-Face You!!

Oh teething. How I loathe you for keeping me up at night and giving my child the runs and making his nose flood and getting his clothes SO WET. Please, can't you just come once and get it over with?

No.

And so, mama has to think of something. Bibs? Oh, please. That's so BABY! ;) We've got a young MAN on our hands. How 'bout a hanky?

 
And look at that. Proof that it works.It definitely gets soaked.


And pair it with a pair of upcylced, mama-made pants you've got quite the ensemble. 


My favorite thing about it? I made it out of the sleeves of the shirt that I made this dress out of. Trust me, there is nothing left of that shirt. And there are many more of these hankys in the works. And perhaps a tutorial??

Oh, and the Car Basket tute will be up in a couple of days.

Happy Hump Day Y'all!! (that's the Arkansas getting into me...HELP!)

Monday, December 14, 2009

Bank Robbery

Here's a gift I made for my nephew. The kid loves to watch "horsey" (aka old westerns) with his grandpa. He's getting a cowboy hat and boots from other family members, so I thought I would make him a few accessories. The cost? $0, as I had everything in my stash. And the coins were left over from a Mardi Gras Christmas party we attended this weekend. Gotta love that. I got the original idea from Little Birdie Secrets and just ran with it.
.

{trying to look mean and tough}


{commence: giggle}

Related Posts Plugin for WordPress, Blogger...