First, measure your space. How big do you want this sucker?? Me? I needed mine to be 13" square. So all of the instructions will be given to those dimensions. However, for your own, just measure your sapce and decide how big and then cut your panels one inch bigger than that. Now let's get started.
Here's what you'll need:
4- 14" squares of heavy weight fabric (something like canvas, or upholstery fabric)
5- 14" squares of medium weight fabric (anything from a good cotton to home dec. Mine was a recylced curtain)
1- 10" x 21" of the heavy weight fabric (for front pockets)
1- 12" x 18" of the heavy weight fabric (for book pocket)
1- 14" square of faux suede, or something else that is non-slip
5- 14" squares of Peltex 71f single-sided fusible heavy stabilizer
4 yards coordinating double fold bias tape
Other obvious sewing notions that I am assuming that you have;)
**I used 1/2" seams on everything.
1. Iron Peltex stabilizer to the wrong side of your heavy weight fabric squares and faux suede.
2. Sew the bias tape to one of the long sides of your 10" x 21" piece (and toon eof the long sides of your 12" x 18" piece, while you're at it).
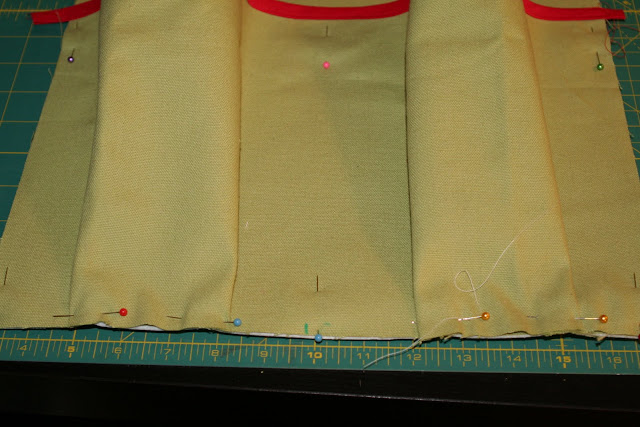
4. Line up the bottom edges at the the center markings and pin straight up the center.
6. Pleat the extra fabric to make two pockets and pin.
7. Sew along the 3 edges and down the middle, making two separate pockets.
8. Now take another heavy weight square and your 12" x 18" piece and you'll follow similar steps to make the book pocket. Pin the three sides and make a pleat in the bottom and sew the three sides.
9. Now sew your four sides together to make a box, right sides together.
10. Flip your box upside down and pin your faux suede right side down, to the bottom of your box. I didn't get a picture of this because I was trying not to bleed on everything, as I got some pinning injuries...Anyway, sew it all together. TIP: save yourself an injury and sew each side separately, meaning, sew one side, lift your needle, snip and move to the next side. Don't forget to back stitch all the ends! Turn right side out.

11. Now sew your 5 medium weight squares right sides together to make a box. (don't mind the double seams you see, remember that I upcylced a curtain for this...).
12. Put that inside your heavy weight box and pin on the bias tape along the top edge, leaving an extra 1.5" for overlap.
13. Sew your bias tape to the box and you're...ummm...done! Aren't you proud??
If you make one, post it and let me know! I'd love to see it!


12 comments:
Thanks for the tutorial Katie! I would love to make some of these...cute kiddos in that car of yours :)
this is on my 'to-do-list'.I have been looking for a basket to fit in between the car seats in my daughters vehicle, your bucket is perfect. Thank you for the tutorial.
marcia
Awesome organizer! I linked to your tutorial on Craft Gossip Sewing:
http://sewing.craftgossip.com/tutorial-fabric-car-basket-organizer/2010/03/07/
--Anne
It looks very nice! The only issue is that it is not attached to anything. If you put just sligthly heavy things in the basket, the basket and its contents will fly all over (and in your head) if you need to brake heavily.
What a great tutorial! I linked this to my Creative Moms Blog Hop linky. :-) Thanks so much for sharing!
Lindsey
http://kindredspiritmommy.com
What a GREAT bag! I love how you were able to upcycle your curtains as well. You are so, so smart!
Thank you so much for this tutorial! I have been looking all over for one of these! I really appreciate you sharing your talents!
Anne, Thanks for your concern:) However, that is why I suggest putting the faux suede on the bottom. We've had our fair share of slight and heavy :) braking and that basket has not even shifted. I suppose if it was something that you're REALLY REALLY concerned about then it would be very simple to add a strap on the back panel, before you sew it all together, that you could clip a seat belt through. Thanks for visiting!! Tell me if you make it and make any changes! i'd love to see it!
esta ideal buena idea gracias
Thanks for sharing! I can feel the good vibes from a more organized car already. And, if the carseat fails, mine was big enough for my three year old to hop in! ha ha ha
http://www.flickr.com/photos/26430767@N05/4493703079/
Lady, YOU ARE BRILLIANT. I am so making one of these for my two monkeys in the back seat! I am forever grousing about the kid items on the floor of the van. Imagine this! Thank you so much!
I REALLY NEED one of these- thanks for the tutorial!
Post a Comment