Well, in celebration of this lovely news, we threw a party. And we wanted to send along a little something to all the fun friends who came to celebrate with her. We gave gift bags with two crayons, a printed coloring sheet, a Silly Bandz bracelet, and a small bag of the very best gummi bears.
In an effort to be green-like and to make the bag a part of the gift (not just a cellophane sack that would be thrown out before they even left our driveway...) I decided to come up with a super quick gift bag. And let me tell you, these really were super quick. I finished all 12 in under 1 1/2 hours. Not bad.
So, in case you wanted to make your own, here's a quickie tutorial:
First, you'll need an 18" x 7" piece of fabric (enough for one bag, so cut as many of these as you need bags...), coordinating thread and 2 20" pieces of something to use as drawstrings. (I used single fold bias tape, but I wished I would have had white grosgrain ribbon on hand...would have taken less time.)
Finish all four sides of you piece of fabric with a zig zag, overlock or serged stitch.
Iron your two long sides a 1/4" in to the wrong side. Then iron your two short sides in 1".
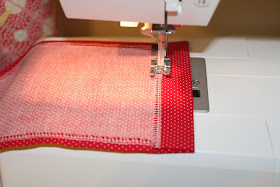
Now edge stitch your two short sides down about 1/8" from the finished edge of the fabric.
Then, fold your fabric in half, wrong sides together and stitch down both sides, starting 1" from the top of the bag, sewing very close to the edge of the fabric.
Your bag is finished! Now you just need to add drawstrings. Like I said before, I used single fold bias tape and zig zagged all the way down . Just feed it through one of the sides of the bag and tie the ends together. Do the same on the other side of the bag.
Now fill that cute little thing with goodies!
Make a bigger size to use as a library bag or a quiet activity bag for church or dining out. This is such an easy, versatile design, you can really use for just about anything!
Sharing the love at:


 >
>


What great bags! Fabulous idea!
ReplyDeleteI'd love it if you linked up to my new party - A Round Tuit, at:
http://jembellish.blogspot.com/2010/08/round-tuit-9.html
Have a great week! and thanks for sharing!
Super cute little baggies, I love to create bags too.
ReplyDeleteTracey
Too cute!
ReplyDeleteterelauritsen.blogspot.com
Link up every thursday-friday!
nice bags, so much cuttier than the usual goodie bags, a great treat by itself!
ReplyDeleteCute idea... I love how it's different from store bought favor bags and can be reused to store all sorts of 4 year old treasures later on :)
ReplyDelete~Emily N. from "too Blessed to Stress"
love it! will certainly use the idea for our next birthday party, or maybe for school gifts!
ReplyDeleteThese are seriously adorable!! So creative! I love how you could create them to match for any party theme!! I'm happily following and would love for you to check me out at FrouFrouDecor! I love new friends!
ReplyDelete~Terrell @ FFD~
Very cute - great idea!
ReplyDeleteSusan,
http://entertainexchange.blogspot.com/
Party and Entertaining Inspiration